> ## Documentation Index
> Fetch the complete documentation index at: https://developers.fireblocks.com/llms.txt
> Use this file to discover all available pages before exploring further.
# Multi-Device Implementation
For Fireblocks' recommended embedded wallet solution, see [Dynamic Embedded Wallets](/docs/dynamic-embedded-wallets). The documentation below covers the legacy Embedded Wallet APIs and SDKs.
**Device number limit:** To help maintain a wallet performance, each wallet is limited to 10 devices. If you reach this limit, you can disable old or unused devices using this [endpoint](/reference/enabledevice).
The Fireblocks Embedded Wallet (EW) solution allows multiple devices to perform actions using the same wallet, such as signing transactions and running takeovers. This lets you support a multi-device, multi-platform seamless digital experience and enables an end user to use their account on any of their devices.
## Definitions
Let us define the following two types of devices for a multiple-device wallet:
* **Requesting device:** A new device that wants to join the wallet.
* **Approving device:** The device in the wallet that can already run operations, like signing transactions; for example, the device you generated key shares with.
## Supported functions
Two functions in the EW SDK interface support multiple devices:
* **`requestJoinExistingWallet`:** A function in the requesting device that receives a handler that emits events according to the progression of the process. Specifically, the function emits `requestId`, the UUID used to approve the request.
* **`approveJoinWalletRequest`:** A function in the approving device that receives a `requestId` and will allow the processing of the approval to start.
# Implementing multiple devices
## Requesting to join a wallet
First, using your authentication solution, verify that the end user's requesting device is trying to join a wallet that has already generated key shares and that that device is currently associated with such a wallet.
You can check on the device's key status via the EW SDK by calling `getKeysStatus()` to verify that the keys are in the `READY` status.
Next, initialize the Fireblocks SDK through the requesting device with a new `deviceId`. Make sure you know which wallet you want to associate this device with, according to the authentication your end user went through.
Then, use the requesting device to call the `requestJoinExistingWallet` function with a handler. This handler emits events that notify your application of the progress of the `requestJoinExistingWallet` procedure.
```javascript Web theme={"system"}
await ewCore.requestJoinExistingWallet({
onRequestId(requestId) {
// your code here
set((state) => ({ ...state, addDeviceRequestId: requestId }));
},
onProvisionerFound() { // -> optional
// your code here
},
});
```
```kotlin Android theme={"system"}
val joinWalletHandler: FireblocksJoinWalletHandler = object : FireblocksJoinWalletHandler {
override fun onRequestId(requestId: String) {
// use this requestId to approve the request from the source device, e.g. using a QR code or a push notification
// the requestId will be used in approveJoinWalletRequest method
}
override fun onProvisionerFound() {
// use this indication the provisioner device was found and the join process continues, e.g. show a spinner/progress bar
}
}
Fireblocks.getInstance(deviceId).requestJoinExistingWallet(joinWalletHandler) { result ->
Timber.i("joinExistingWallet result: $result")
}
```
```swift iOS theme={"system"}
//Initialize and create the Core SDK instance
let instance = try getCore()
//joinWalletHandler: FireblocksJoinWalletHandler
let result = try await instance.requestJoinExistingWallet(joinWalletHandler: joinWalletHandler)
```
After you call the `requestJoinExistingWallet` function, it yields a `requestId` in three ways:
1. Via the events handler submitted with the EW SDK's initialization.
2. Via the `joinWalletResolver` callback associated with the function itself.
3. Via a webhook notification. For example:
```javascript Web (JavaScript) theme={"system"}
{
type: "NCW_ADD_DEVICE_SETUP_REQUESTED",
tenantId: string,
timestamp: number,
data: {
walletId: string,
deviceId: string,
requestId: string,
},
};
```
## Approving a new device
The approving device calls the `approveJoinWalletRequest` function with the corresponding `requestId` to approve or reject the new device.
```javascript Web (JavaScript) theme={"system"}
const result = await ewCore.approveJoinWalletRequest(requestId);
console.log("approveJoinWallet result:", result);
```
```kotlin Android (Kotlin) theme={"system"}
Fireblocks.getInstance(deviceId).approveJoinWalletRequest(requestId) { result ->
Timber.i("approveJoinWallet result: $result")
}
```
```swift iOS theme={"system"}
//Initialize and create the Core SDK instance
let instance = try getCore()
return try await instance.approveJoinWalletRequest(requestId: requestId)
```
When a new device is approved, the process of adding the requesting device begins and takes a few seconds to send multiple MPC messages.
On the existing device, we will then see additional MPC messages until the key material is ready to be stored.
Eventually, the requesting device will join the wallet and be able to run all MPC-related actions.
# Multiple device scenarios
In a multi-device scenario, all devices see the same balance, can initiate and sign transactions, approve adding a new device to the wallet, or perform any other action, such as takeover.
When performing a transaction, once a device is approved and your wallet has multiple devices, you can create a transaction from one device and sign that transaction from any other device associated with the wallet.
However, remember that only one device in a wallet can sign a specific transaction. If multiple devices "race" to sign the same transaction, only one device will succeed, and the other devices' sign transaction command will eventually time out.
# Multiple device events
The `approveJoinWalletRequest` and `requestJoinExistingWallet` functions can yield the following events emitted by the events handler.
## Approving device
* PROVISION\_INITIATED
* PROVISION\_ADD\_DEVICE\_SETUP\_REQUESTED
* PROVISION\_KEYS\_SETUP\_STARTED
* PROVISION\_SETUP\_STARTED
* PROVISION\_SETUP\_COMPLETED
* STOPPED
* TIMEOUT
## Requesting device
* JOIN\_INITIATED
* ADD\_DEVICE\_SETUP\_REQUESTED
* PROVISIONER\_FOUND
* STOPPED
* TIMEOUT
# Troubleshooting
## Request timeout
There is a three-minute timeout before the Fireblocks and EW SDKs terminate the `requestJoinExistingWallet` and `approveJoinWalletRequest` functions. This means that you should guide the user to open the existing device to approve the action before they initiate this flow. However, you can call the `stopJoinWallet` function if you want or need to implement a different timeout configuration, or simply kill the process. Then, you can retry the process by calling the appropriate function again.
## Procedure didn't work
If a procedure with a `deviceId` did not work as expected, try to join the wallet with a new `deviceId`. There is no limit to the number of new devices an approving device can approve.
# Multiple devices FAQ
## What type of devices are supported?
The end user can add any combination of devices supported by our SDKs.
## How many devices can an end user add to a single wallet?
An end user can add up to 10 devices to a single wallet.
## How do I implement multiple devices for my app?
You can achieve this in various ways, depending on your implementation. Below you can view an example flow of a requesting device and an example flow of an approving device.
### Requesting device example
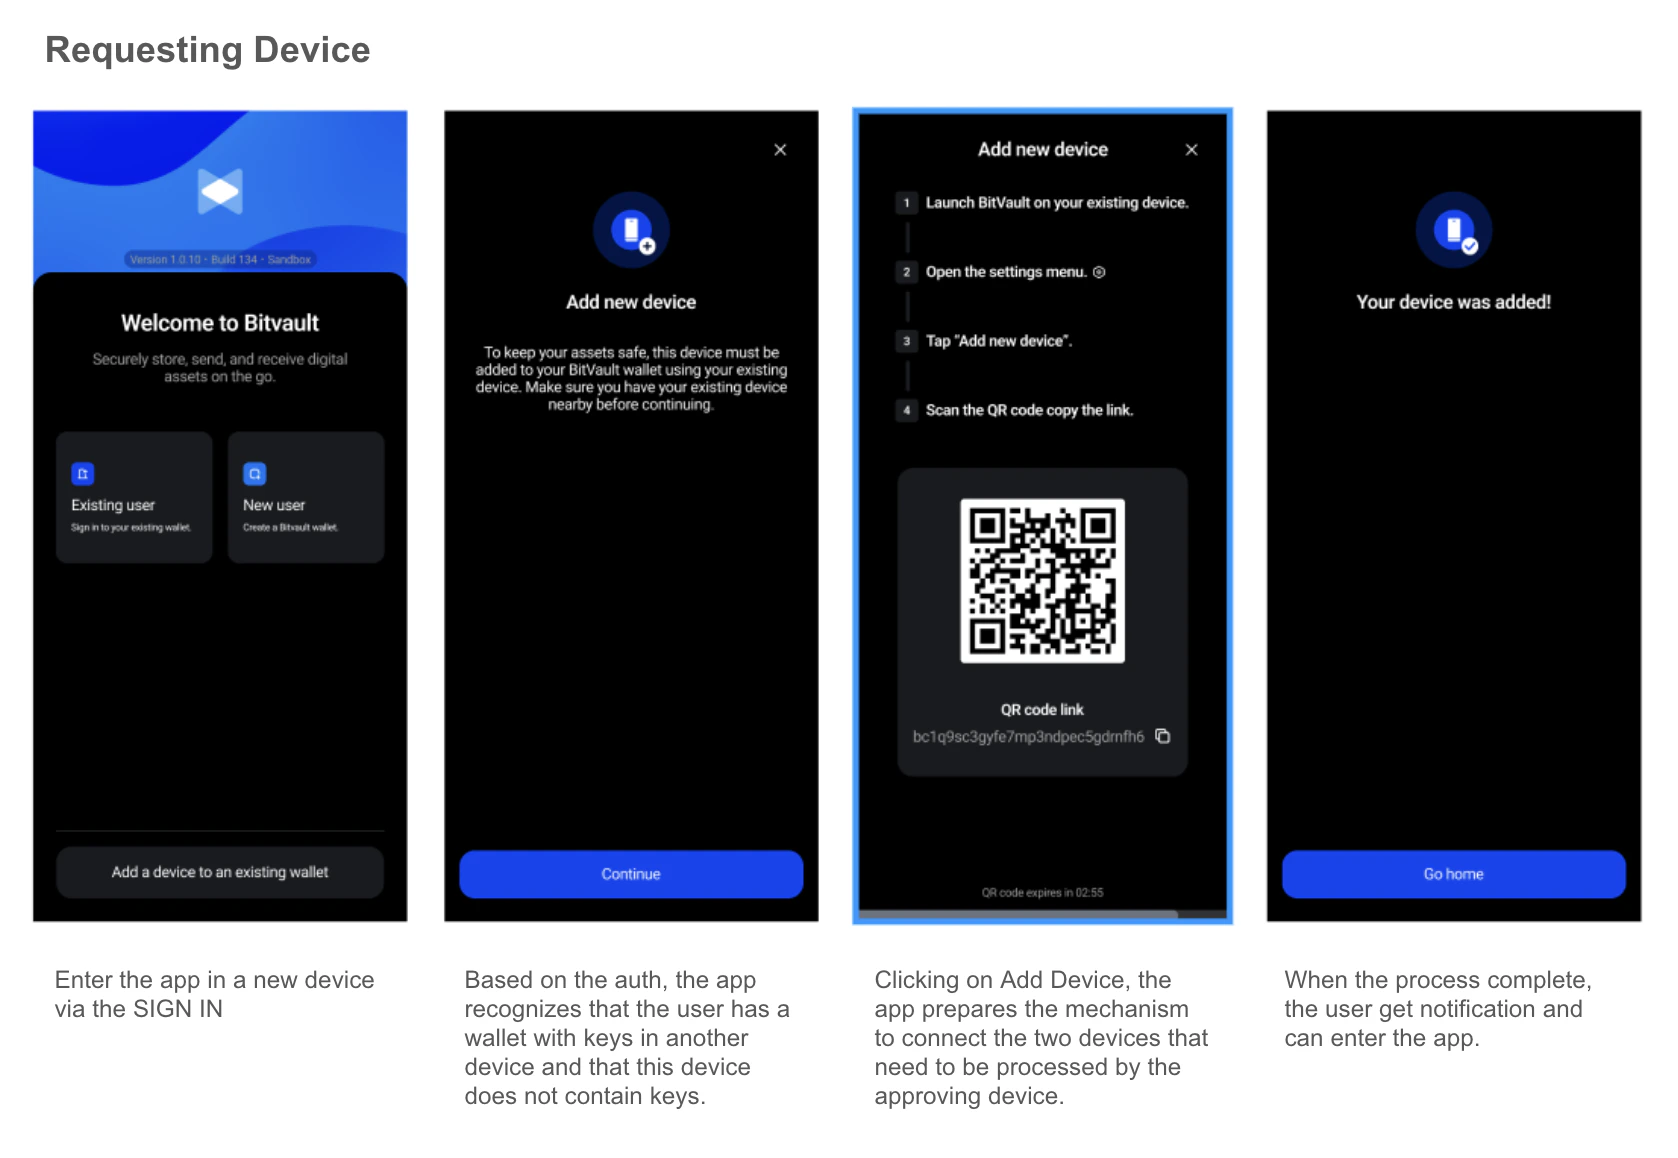 The end user enters the app on a new device after passing the authorization stage. The app recognizes that the user has a wallet with keys on another device and that the current device doesn't contain any keys. The app then presents the user with the following options:
1. Add a new device; if the user has another device, they can use it to onboard the new device.
2. Recover a device if the user does not have another device.
3. Skip, which continues to the app without creating a wallet.
### Approving device example
The end user enters the app on a new device after passing the authorization stage. The app recognizes that the user has a wallet with keys on another device and that the current device doesn't contain any keys. The app then presents the user with the following options:
1. Add a new device; if the user has another device, they can use it to onboard the new device.
2. Recover a device if the user does not have another device.
3. Skip, which continues to the app without creating a wallet.
### Approving device example
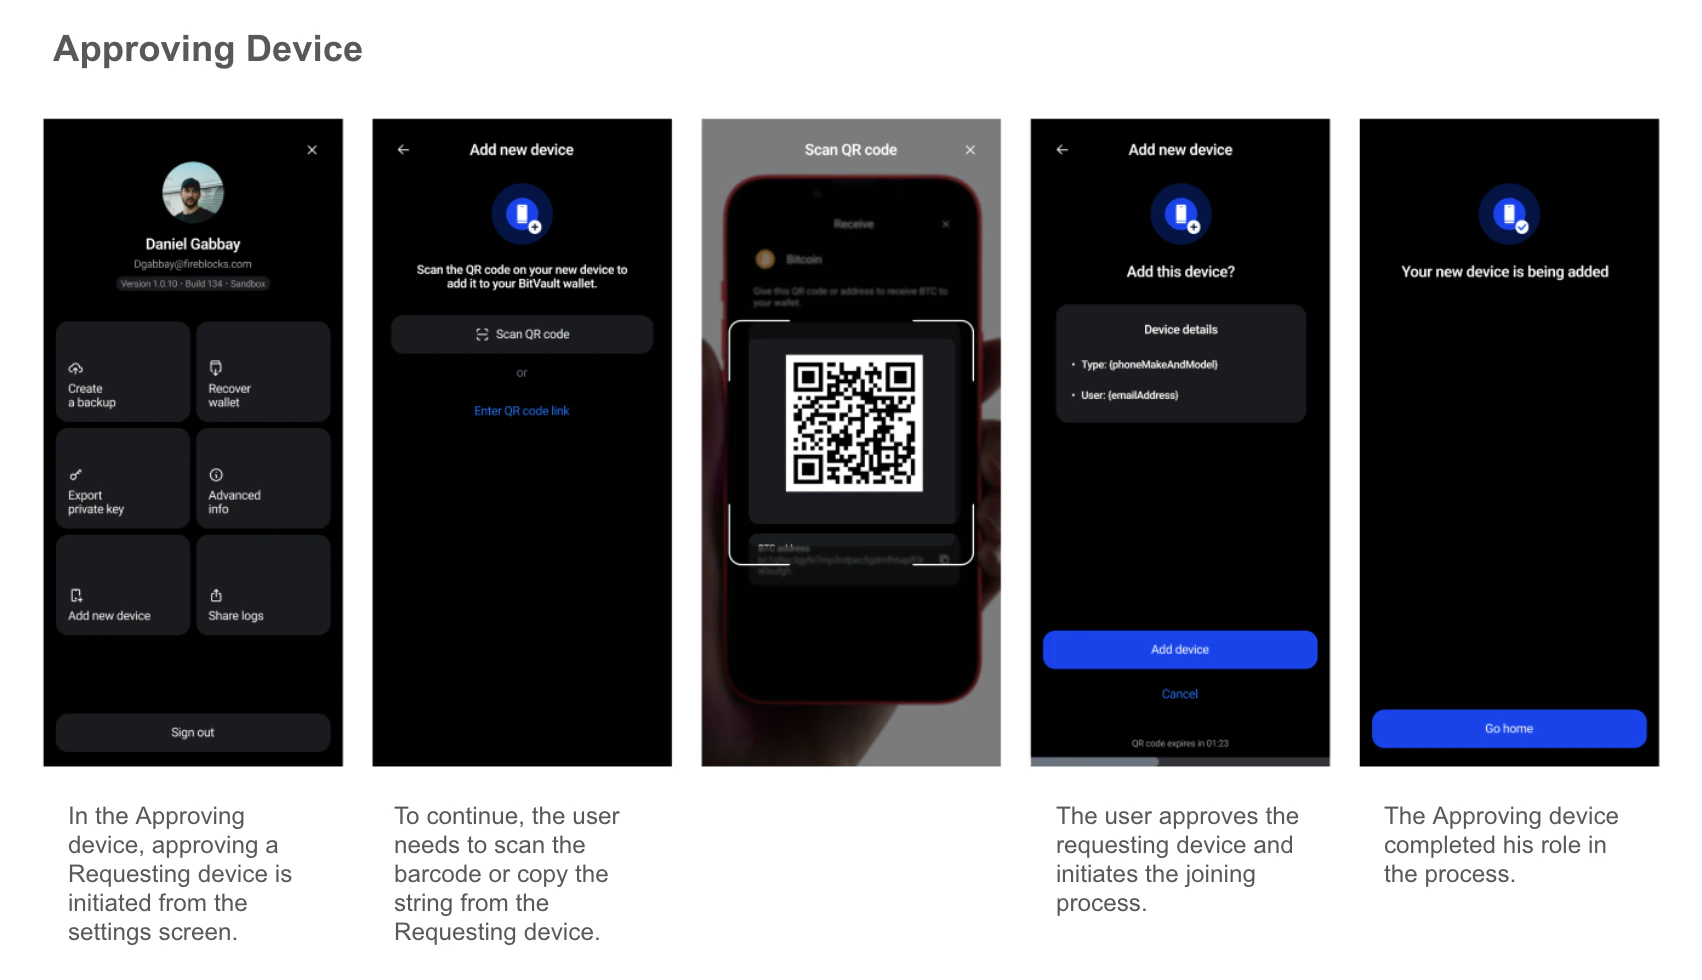 Depending on the guidance the user receives from the requesting device, they should typically open an approving device's Settings page and initiate the Add New Device flow.
## Is adding a device always tied to the device onboarding flow?
No. Adding a device can also be initiated anywhere within the app based on the app's objectives. For example, the Add New Device flow can be triggered when the user enters a specific part of the app, when they perform a specific action within the app, or initiated directly from the app's Settings page.
Depending on the guidance the user receives from the requesting device, they should typically open an approving device's Settings page and initiate the Add New Device flow.
## Is adding a device always tied to the device onboarding flow?
No. Adding a device can also be initiated anywhere within the app based on the app's objectives. For example, the Add New Device flow can be triggered when the user enters a specific part of the app, when they perform a specific action within the app, or initiated directly from the app's Settings page.