> ## Documentation Index
> Fetch the complete documentation index at: https://developers.fireblocks.com/llms.txt
> Use this file to discover all available pages before exploring further.
# Install SGX Azure Marketplace API Co-signer
The Fireblocks API Co-signer script is available as a managed and versioned component through [the Azure Marketplace](https://azuremarketplace.microsoft.com/en-us/marketplace/apps/fireblocksinc1626390946623.co-signer?tab=Overview). This solution automates the deployment process, eliminating the need to create an SGX-enabled VM and install the Co-signer.
To install an SGX Co-signer in Microsoft Azure and connect it to your workspace through the Azure Marketplace, complete the following steps.
## Step 1: Add a Co-signer to the workspace using an API user
Follow the instructions to [add a new Co-signer to the workspace](/reference/install-api-cosigner-add-new-cosigner-p2). Ensure you copy to your clipboard the following items, which you will use during the installation process:
* The API user's pairing token
* The download link of the Co-signer's installation script
## Step 2: Set up your Azure environment, install and connect the Co-signer to the workspace
### 2.1. Azure prerequisites
You must have a valid Azure Subscription with permissions to create Confidential Compute VMs, VNets, Resource Groups, and OS Disk at a minimum. Your subscription must also be registered for `Microsoft.Compute`, `Microsoft.Solutions` and `Microsoft.Network` service providers.
Your Azure subscription must have Quota limits enabled for `Standard_DC4s_v3` VM. If you are unsure, check with your Azure Administrator. You may have to submit a support ticket with Microsoft to increase the quota limits.
Also, your Azure subscription must have the following permissions:
* `Microsoft.Solutions/locations/operationStatuses/read`
* `Microsoft.Resources/deployments/write`
* `Microsoft.Network/virtualNetworks/write`
* `Microsoft.Network/networkInterfaces/write`
* `Microsoft.Compute/virtualMachines/write`
* `Microsoft.Compute/virtualMachines/extensions/write`
### 2.2. Using the marketplace automation
Complete the following steps to deploy a new SGX Co-signer using the Azure Marketplace.
#### Basics tab
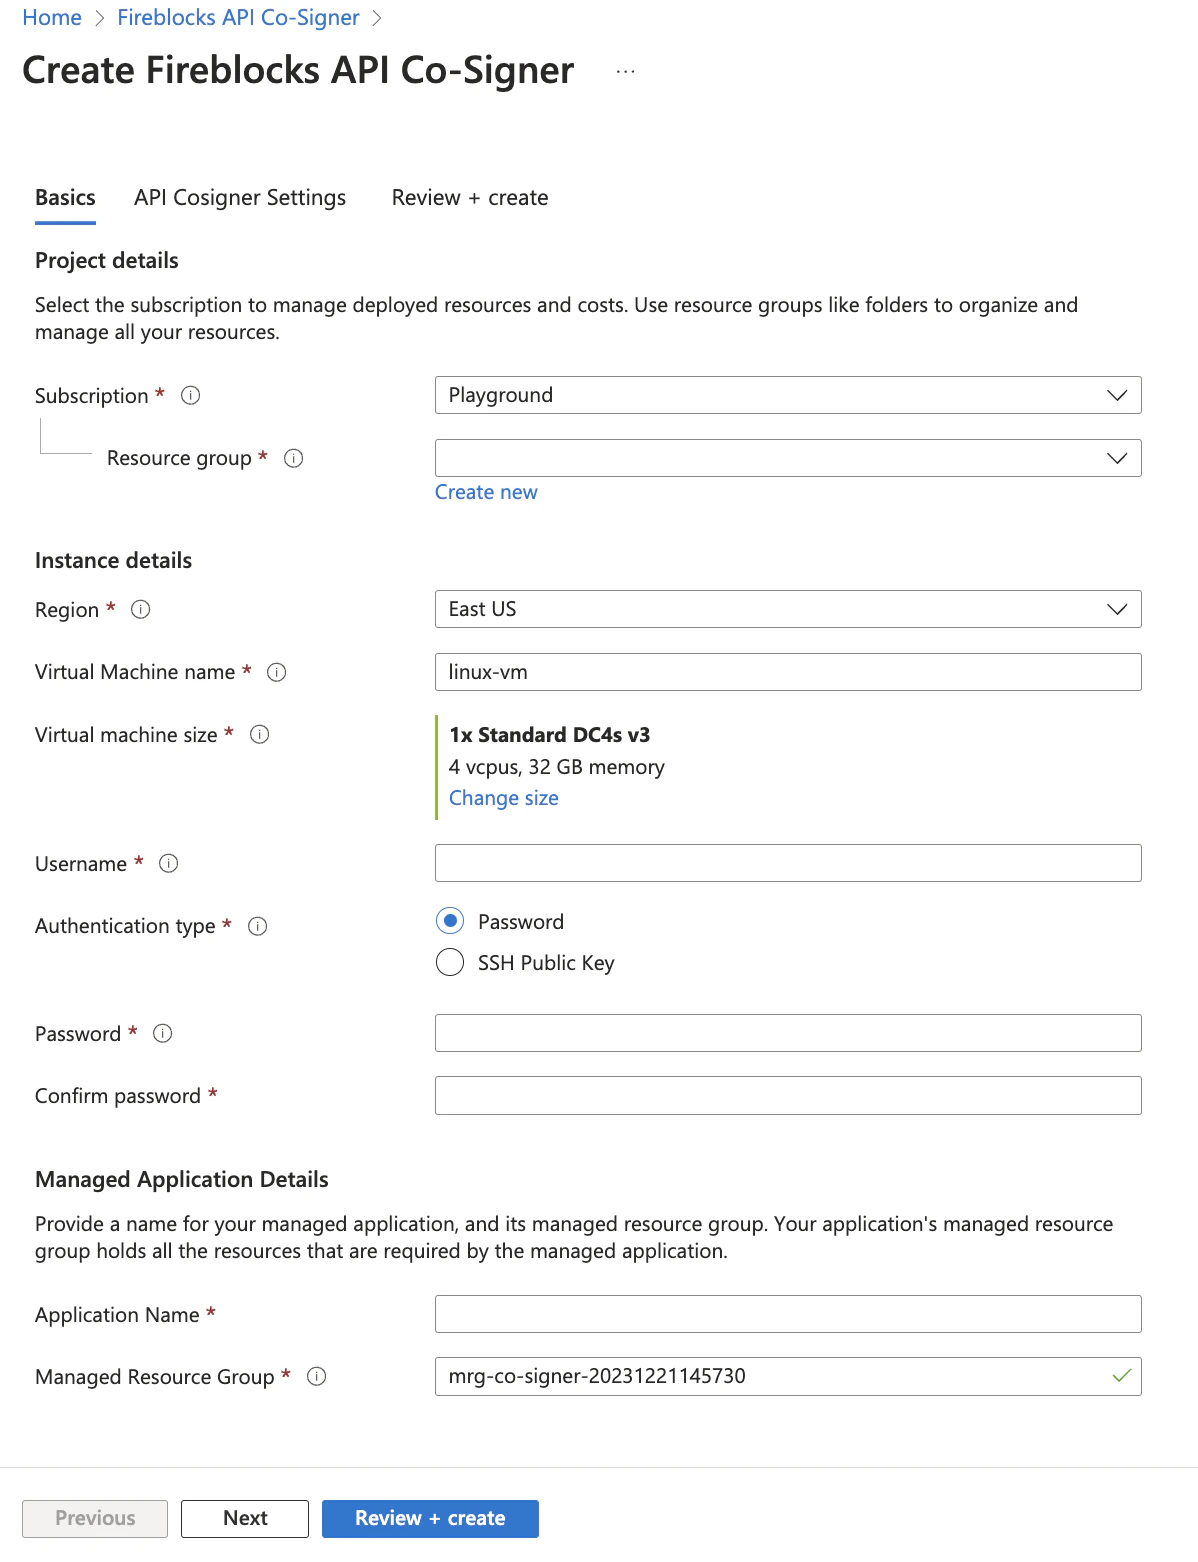
* Under **Subscription**, select or enter your existing Azure subscription where you want to deploy this Co-signer.
* Under **Resource group**, select or create a group that properly organizes your resources within your subscription (i.e. geographic, commercial, sales affiliation, etc).
* Under **Region**, select the geographic region where you want your virtual machine to be deployed.
* Under **Virtual Machine**, select a name for your machine that is aligned with your best practices. Here you can also change the machine’s size, depending on your estimate of your projected transaction volume. We recommend DC4S as a minimum, but you may decide to change it based on your expected processing volume.
* Under **Username**, enter a username, and we will create one for you with an admin role, which is necessary for the creation of your API Co-signer and for logging into and fully managing your Azure’s virtual machine.
* Alternatively, if you are not interested in a username and password, you can upload a **Public key**. Once we receive it from you, we will use it to create a virtual machine for you, and you can use this key to log into the machine.
* If you decide to go with a username, enter and confirm a **Password** of your choice. The password must meet the specifications listed on the marketplace.
* Under **Managed application**, which is where we package all of your resources (the VM, Virtual network, storage), enter the name of your managed application (just as you entered the name of your Subscription above).
* Similarly, under **Managed resource group**, enter the name of your Managed resource group (just as you entered the name of your Resource group above).
* Select Next to move on to the next tab.
 #### API Cosigner Settings tab
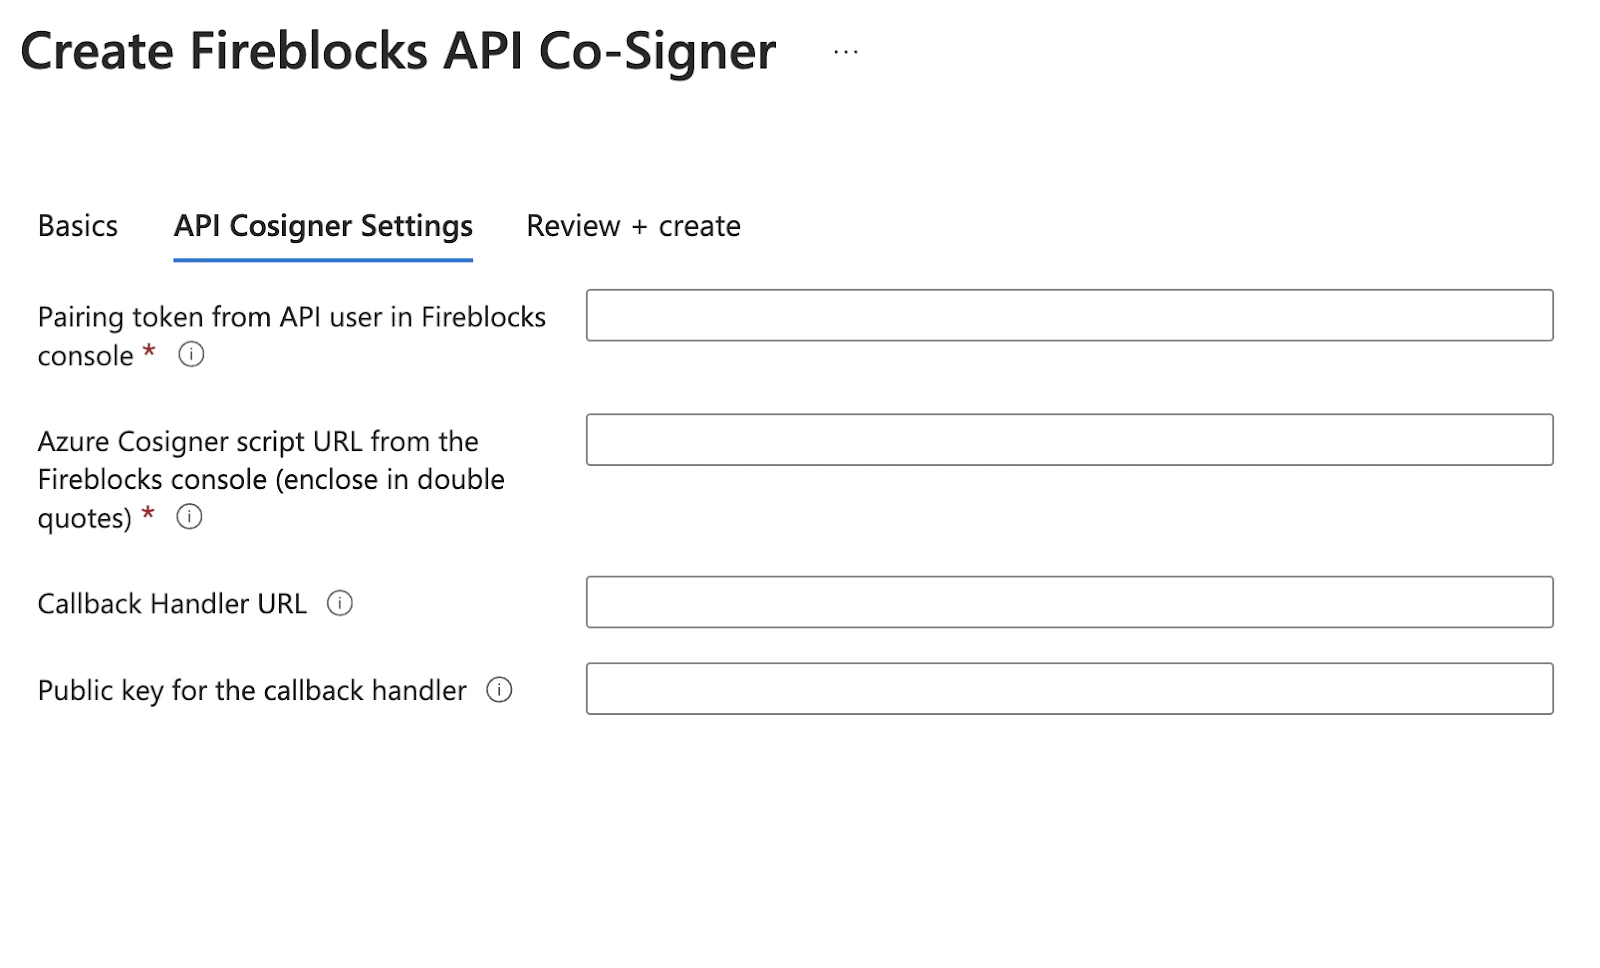
* Enter the API user's pairing token you copied from the Console
* Enter the download link of the SGX Co-signer's installation script you copied from the Console
At this stage, you will have the option to configure the Callback Handler parameters for the API user connecting the Co-signer to the workspace. This feature is optional. You can [configure it later through the Console, APIs, or locally](/reference/api-cosigner-operate) from the Co-signer's host machine.
For detailed instructions on setting up your Callback Handler's interface to the Co-signer and implementing its logic and code, refer to the [Setup API Co-signer Callback Handler](/reference/api-cosigner-setup-callback-handler) section.
#### API Cosigner Settings tab
* Enter the API user's pairing token you copied from the Console
* Enter the download link of the SGX Co-signer's installation script you copied from the Console
At this stage, you will have the option to configure the Callback Handler parameters for the API user connecting the Co-signer to the workspace. This feature is optional. You can [configure it later through the Console, APIs, or locally](/reference/api-cosigner-operate) from the Co-signer's host machine.
For detailed instructions on setting up your Callback Handler's interface to the Co-signer and implementing its logic and code, refer to the [Setup API Co-signer Callback Handler](/reference/api-cosigner-setup-callback-handler) section.
 #### Review + Create tab
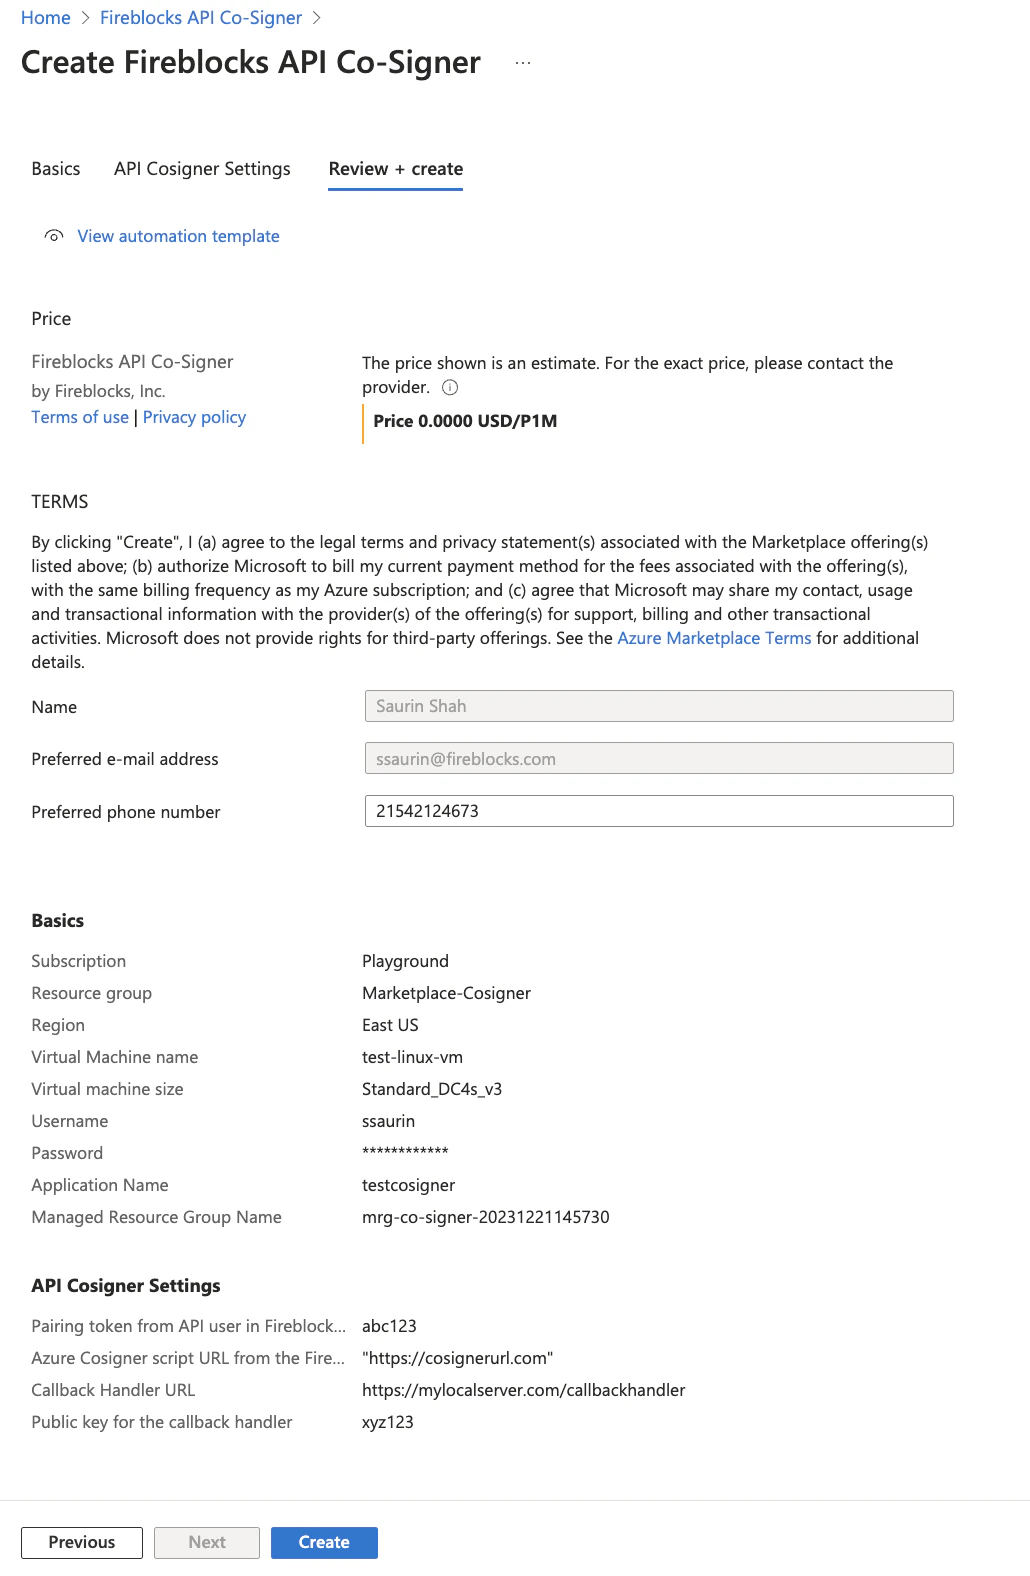
In this tab, you can review all the information you provided in the previous sections and confirm it is accurate, or go back to modify whatever needs correction.
Select **Create**, and the Azure Marketplace solution will initiate the creation of the Azure SGX API Co-signer after a few minutes. If the deployment fails, you will see an error on the Azure Marketplace portal along with details on its root cause. Refer to the Troubleshooting section below for potential issues that could cause such a failure.
#### Review + Create tab
In this tab, you can review all the information you provided in the previous sections and confirm it is accurate, or go back to modify whatever needs correction.
Select **Create**, and the Azure Marketplace solution will initiate the creation of the Azure SGX API Co-signer after a few minutes. If the deployment fails, you will see an error on the Azure Marketplace portal along with details on its root cause. Refer to the Troubleshooting section below for potential issues that could cause such a failure.
 #### Co-signer script
The Azure Co-signer script is installed in the home folder of the admin user (e.g., `/home/yourname/`). You can [operate](/reference/api-cosigner-operate) and [maintain](/reference/api-cosigner-maintenance-sgx) the Co-signer using the Console or the script from the Azure VM, just as you would from the command line of an SGX machine you set up manually.
### 2.3: Approve MPC key shares for the API user
If the API user used to pair with the Co-Signer and connect it to your workspace has an Admin or User role, the workspace owner will receive a notification. This notification will prompt them to approve a new MPC key share request for that API user using the Fireblocks mobile app.
You can now see the Co-signer you installed in the Co-signers tab within the Console's Developer Center. Observe it is online and that the API user is paired to it.
## Troubleshooting
**Co-signer Maintenance**
To check the Co-signer's status and observe the logs, see the [SGX Co-signer Maintenance](/reference/api-cosigner-maintenance-sgx) article.
Since the solution is deployed on an Azure instance in your environment, a wide range of issues may occur depending on your configuration. Here are some common issues:
* Quota limits on your subscription may prevent the provisioning of `Standard_DC4s_v3 VM`. You may have to request an increase in quota limits or open a support ticket with Microsoft to increase the quota limits.
* Review the Azure deployment logs for any permissions-related errors. [Learn more about resolving these errors in the official Microsoft Azure documentation](https://learn.microsoft.com/en-us/azure/azure-resource-manager/troubleshooting/error-register-resource-provider?tabs=azure-portal).
* Ensure your subscription has Microsoft.Compute, Microsoft.Solutions, and Microsoft.Network registered.
* Your subscription should also have permission to create resource groups.
* Your Azure subscription should have the permissions listed in the prerequisites section above.
* Check if your pairing token has expired. If it has, renew the token and try again.
* The API Co-signer script URL must be entered with opening and closing double quotes.
* If you modified the default VM, make sure you selected an SGX-enabled VM.
* Log a ticket with Fireblocks Support and attach the `*_run.log` files from the `/var/lib/waagent/custom-script/download/0` folder.
* You may need to delete the VM and any resources created during the deployment of the solution.
#### Co-signer script
The Azure Co-signer script is installed in the home folder of the admin user (e.g., `/home/yourname/`). You can [operate](/reference/api-cosigner-operate) and [maintain](/reference/api-cosigner-maintenance-sgx) the Co-signer using the Console or the script from the Azure VM, just as you would from the command line of an SGX machine you set up manually.
### 2.3: Approve MPC key shares for the API user
If the API user used to pair with the Co-Signer and connect it to your workspace has an Admin or User role, the workspace owner will receive a notification. This notification will prompt them to approve a new MPC key share request for that API user using the Fireblocks mobile app.
You can now see the Co-signer you installed in the Co-signers tab within the Console's Developer Center. Observe it is online and that the API user is paired to it.
## Troubleshooting
**Co-signer Maintenance**
To check the Co-signer's status and observe the logs, see the [SGX Co-signer Maintenance](/reference/api-cosigner-maintenance-sgx) article.
Since the solution is deployed on an Azure instance in your environment, a wide range of issues may occur depending on your configuration. Here are some common issues:
* Quota limits on your subscription may prevent the provisioning of `Standard_DC4s_v3 VM`. You may have to request an increase in quota limits or open a support ticket with Microsoft to increase the quota limits.
* Review the Azure deployment logs for any permissions-related errors. [Learn more about resolving these errors in the official Microsoft Azure documentation](https://learn.microsoft.com/en-us/azure/azure-resource-manager/troubleshooting/error-register-resource-provider?tabs=azure-portal).
* Ensure your subscription has Microsoft.Compute, Microsoft.Solutions, and Microsoft.Network registered.
* Your subscription should also have permission to create resource groups.
* Your Azure subscription should have the permissions listed in the prerequisites section above.
* Check if your pairing token has expired. If it has, renew the token and try again.
* The API Co-signer script URL must be entered with opening and closing double quotes.
* If you modified the default VM, make sure you selected an SGX-enabled VM.
* Log a ticket with Fireblocks Support and attach the `*_run.log` files from the `/var/lib/waagent/custom-script/download/0` folder.
* You may need to delete the VM and any resources created during the deployment of the solution.