
Overview
To install an SGX Co-signer in Alibaba Cloud and connect it to your workspace, follow these steps:- Setup and configure your Alibaba Cloud environment Prepare your Alibaba Cloud environment by creating and configuring the required resources. Ensure it meets the necessary specifications and security settings.
- Add a Co-signer to the workspace using an API user Using the Fireblocks Console or APIs, create an API user and use it to add a Co-signer to the workspace.
- Install and connect the Co-signer to the workspace Download the installation script to the SGX-capable virtual machine and run the script to install the Co-signer. Once installation is complete, the workspace owner approves the new MPC key shares for the API user through the Fireblocks mobile app.
Step 1: Setup and configure your Alibaba Cloud environment
1.1. Allowlist domains
To ensure the Co-signer can be installed and operated successfully, add the following domains to your allowlist:
Fireblocks-owned domains differ based on the specific Fireblocks SaaS environment you are connected to. If you are connected to the European or Swiss SaaS, update your allowlist according to the domains listed in the table below:
Additionally, ensure port access is configured for the following services:
If you cannot support DNS IP whitelisting with an advanced firewall or within the cloud itself, you must allow egress traffic to any destination on port 443.
1.2. Create an SGX virtual machine
See this Alibaba Security Enhanced Instance Family Overview document for details on which instance type to select.
- RAM: 16GB
- Storage: 256GB
- OS:
- Ubuntu 20.04
- Latest Linux kernel version
- Latest Intel microcode (BIOS update)
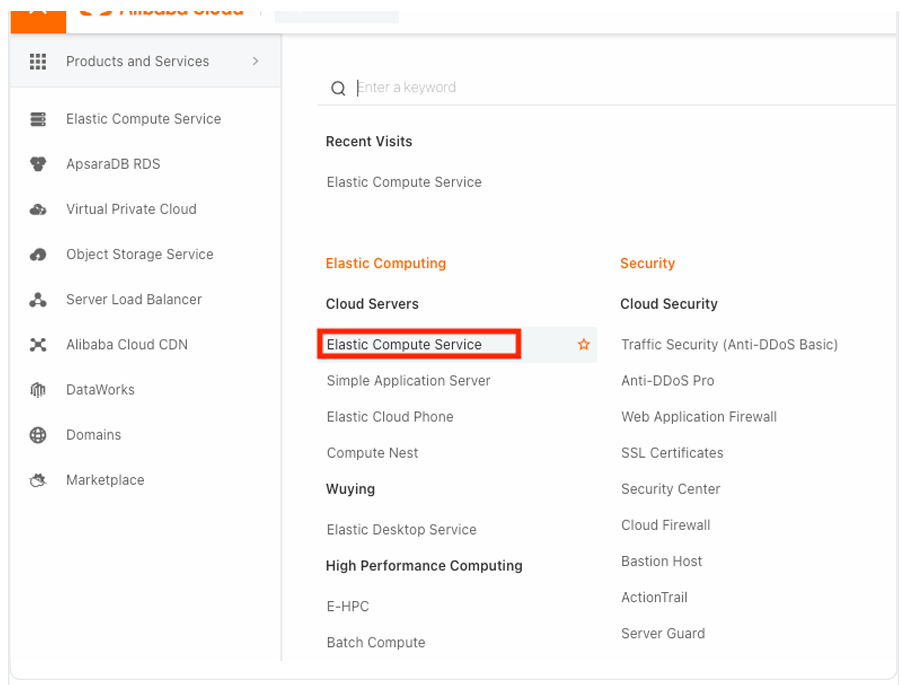
- On the Workbench page, click Elastic Compute Service.
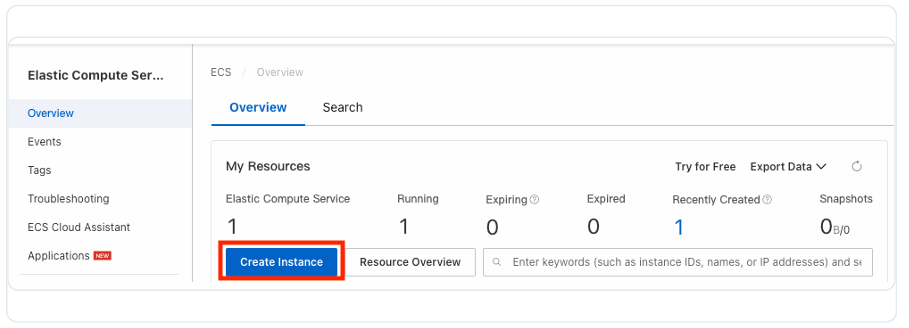
- On the Overview tab, click Create Instance.
- Select the following options from Custom Launch:
- Region: Select your region.
- Instance Type: Enter “g7t” in “Search by instance type name”, then select
ecs.g7t.2xlarge(recommended).
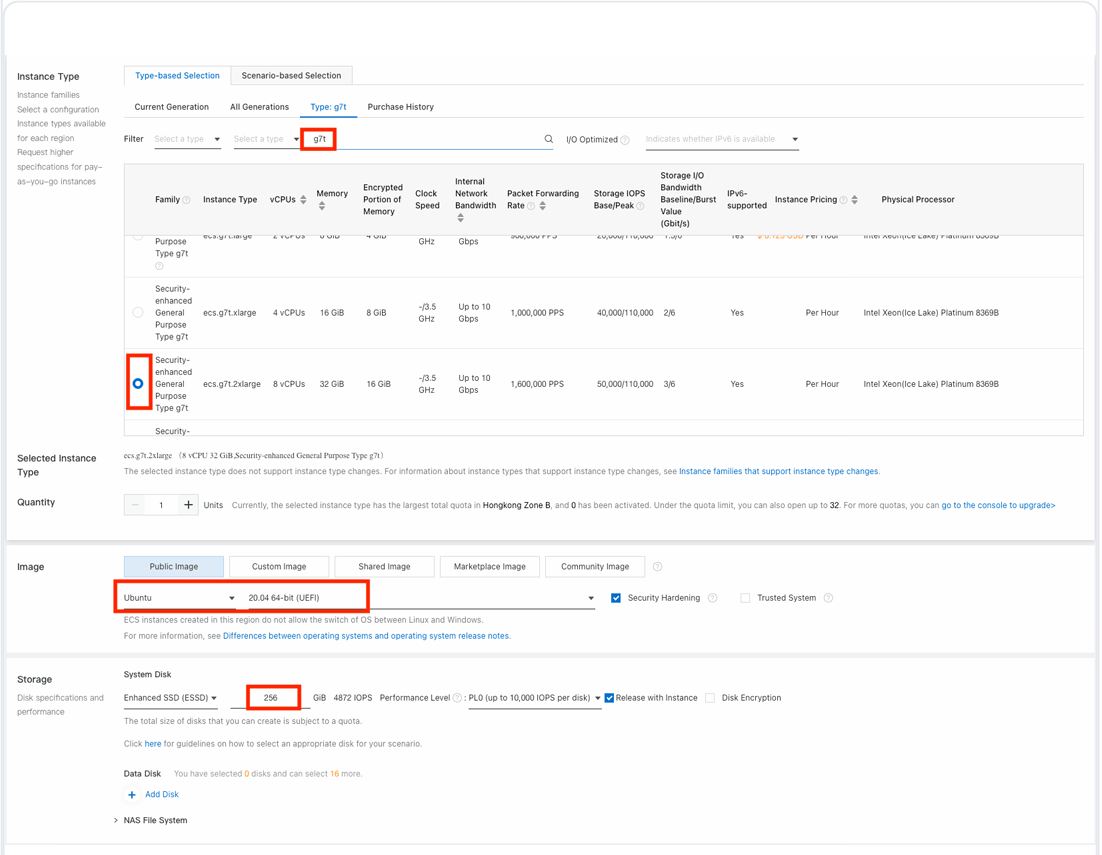
- Complete the Networking, System Configurations, and Grouping pages per your organization’s policies for each.
- Click Create Instance.
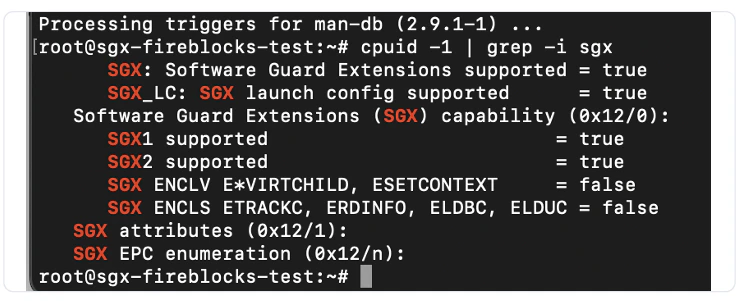
1.3. Verify SGX is enabled on your VM
After creating your virtual machine, confirm that SGX is enabled. The SGX Co-signer requires a server with SGX enabled and the latest patches applied. This verification ensures smooth operation and avoids potential issues. To verify that SGX is enabled on the VM, run the following commands with root privileges::SGX: Software Guard Extensions supported is trueSGX_LC: SGX launch config supported is true
1.4. Additional security recommendations
It is highly recommended to control user and network access to Co-signer’s machine. See API Co-signer security checklist and recommended defense and monitoring systems for further information.Step 2: Add a Co-signer to the workspace using an API user
Follow the instructions to add a new Co-signer to the workspace. Ensure you copy to your clipboard the following items, which you will use during the installation process:- The API user’s pairing token
- The download link of the Co-signer’s installation script
Step 3: Install and connect the Co-signer to the workspace
You must have root privileges on the Co-signer machine to install the Co-signer. Ensure you are logged in as a root user or use
sudo to execute the commands.3.1. Download the installation script
Using the download link of the SGX Co-signer installation script you copied from the Console, run thecurl command to download the package directly to your machine.
Paste the appropriate URL into the following command:
3.2. Run the installation script
After downloading the installation script, navigate to the directory containing the script and modify the script’s permissions to make it executable:3.3: Approve MPC key shares for the API user
If the API user used to pair with the Co-Signer and connect it to your workspace has an Admin or User role, the workspace owner will receive a notification. This notification will prompt them to approve a new MPC key share request for that API user using the Fireblocks mobile app. You can now see the Co-signer you installed in the Co-signers tab within the Console’s Developer Center. Observe it is online and that the API user is paired to it.To check the Co-signer’s status and observe the logs, see the SGX Co-signer Maintenance article.