
Overview
To install an SGX Co-signer on-premises and connect it to your workspace, follow these steps:- Setup and configure your on-prem environment: Prepare your on-prem environment by creating and configuring the required resources. Ensure it meets the necessary specifications and security settings.
- Add a Co-signer to the workspace using an API user: Using the Fireblocks Console or APIs, create an API user and use it to add a Co-signer to the workspace.
- Install and connect the Co-signer to the workspace: Download the installation script to the SGX-capable machine, then run it to install the Co-signer. Once installation is complete, the workspace owner approves the new MPC key shares for the API user through the Fireblocks mobile app.
Step 1: Set up and configure your on-prem environment and SGX server
Step 1.1: Allowlist domains
To ensure the Co-signer can be installed and operated successfully, add the following domains to your allowlist:
Fireblocks-owned domains differ based on the specific Fireblocks SaaS environment you are connected to. If you are connected to the European or Swiss SaaS, update your allowlist according to the domains listed in the table below:
Additionally, ensure port access is configured for the following services:
If you cannot support DNS IP whitelisting with an advanced firewall or within the cloud itself, you must allow egress traffic to any destination on port 443.
Step 1.2: Set up and configure an on-prem SGX server
Your on-prem SGX server should meet the following hardware requirements:- CPU processor: Only one of the following Intel® processors
- CPU cores: Minimum 4
- OS: Ubuntu 22.04 LTS or 24.04 LTS (Canonical) with -
- Latest Linux kernel version
- Latest Intel microcode (BIOS update)
- RAM: Minimum 16GB
- Storage: Minimum 128GB
- SGX Memory: Minimum 2GB EPC
Fireblocks also supports on-prem SGX servers installed on OVHcloud providers.
- Enable Intel SGX (Software Guard Extension)
- Enable DCAP (FLC)
- Disable hyper threading
- Disable Intel SpeedStep Technology
- Disable Onboard VGA
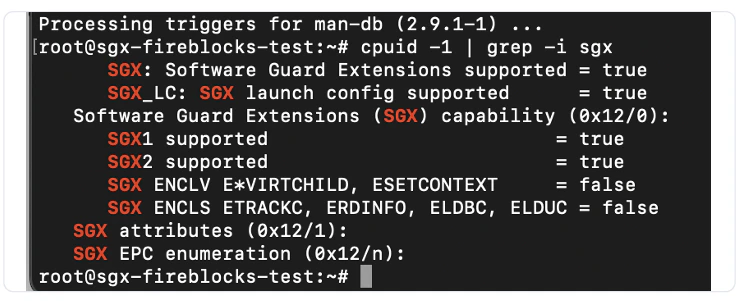
Step 1.3: Verify SGX is enabled on your SGX server
After setting up your on-prem SGX server, confirm that SGX is enabled. The SGX Co-signer requires a server with SGX enabled and the latest patches applied. This verification ensures smooth operation and avoids potential issues. To verify that SGX is enabled on the VM, run the following commands with root privileges:SGX: Software Guard Extensions supported is trueSGX_LC: SGX launch config supported is true
Step 1.4: Install the SGX drivers
- Subscribe to the Intel PCS for ECDSA Attestation and to obtain the required API keys.
-
Set up Intel’s reference caching service, the Provisioning Certification Caching Service (PCCS):
- Redhat/Debian: Installation Guide, page 39
- Another Debian approach: Follow the steps in the document above (intel-dcap.pdf), but skip the Verify the empty cache step.
- Cache Fill Mode: Intel SGX DCAP Caching Service Design Guide, page 38
-
Provision the Intel SGX-enabled platform for Intel SGX workloads. The goal is to run PCKIDRetrievalTool. Make sure pckid_retrieval.csv is created. This file will be used to register the CPU data with Intel. Without this registration, the remote attestation will fail.
- Debian resources: Intel SGX DCAP Quick Install Guide, page 4
- Redhat resources: Download the binary file from one of these locations:
-
Convert the pckid_retrieval.csv file to JSON format using this Python script and submit it to Intel for registration. You can view a sample JSON here.
- For more information about the registration process, visit the following references:
- When prompted to verify the provisioning data, skip this step.
- Reimage the Intel SGX-enabled platform.
-
Load the Intel SGX runtime stack onto the reimaged system:
- Debian: Refer to the Intel SGX DCAP Quick Install Guide, page 5. Note that steps 5 and 6 are bulked up in the “Runtime configuration” section.
- Redhat: Refer to the Intel Confidential Computing Documentation.
Step 1.5: Registration with Intel
- Follow the registration instructions located here. Note that you’ll need the JSON format of the pckid_retrieval.csv file for this step.
-
Verify that your CSV is registered with Intel via Fireblocks:
-
A certificate will appear in the response if the registration was successful:
Step 2: Add a Co-signer to the workspace using an API user
Follow the instructions to add a new Co-signer to the workspace. Ensure you copy to your clipboard the following items, which you will use during the installation process:- The API user’s pairing token
- The download link of the Co-signer’s installation script
Step 3: Install and connect the Co-signer to the workspace
You must have root privileges on the Co-signer server to install the Co-signerEnsure you are logged in as a root user or use
sudo to execute the commands.Step 3.1: Download the installation script
Using the download link of the SGX Co-signer installation script you copied from the Console, run thecurl command to download the package directly to your machine.
Paste the appropriate URL into the following command:
Step 3.2: Run the installation script
After downloading the installation script, navigate to the directory containing the script and modify the script’s permissions to make it executable:Step 3.3: Approve MPC key shares for the API user
If the API user used to pair with the Co-Signer and connect it to your workspace has an Admin or User role, the workspace owner will receive a notification. This notification prompts them to approve a new MPC key share request for that API user in the Fireblocks mobile app. You can now see the Co-signer you installed in the Co-signers tab within the Console’s Developer Center. Observe it is online and that the API user is paired to it.To check the Co-signer’s status and observe the logs, see the SGX Co-signer Maintenance article.