
Fireblocks Retail Demo Application - Work in Progress!
The Fireblocks Retail Demo application is designed to support Fireblocks clients by serving as a reference model for their integration processes. It embodies the best practices that Fireblocks advocates for building secure, retail-facing solutions. This demo aims to accelerate and simplify the integration of Fireblocks into your projects, ensuring that you adhere to the recommended best practices when building on the Fireblocks platform. Retail Demo Application on GitHubOverview
- Frontend: Built with Next.js, this frontend application serves as a retail cryptocurrency platform, providing features like portfolio dashboards, multi-asset wallet management, and transaction handling. It leverages Fireblocks for secure asset management, offering a comprehensive example of a retail-facing crypto solution.
- Backend: Developed with Node.js (Express.js), the backend handles essential operations such as user authentication, wallet and asset management, and transaction processing. It integrates with a MySQL database to store user data locally and communicates with the Fireblocks API for wallet and transaction operations.
Before you start: Fireblocks workspace configurations:
Fireblocks testnet workspace setup
- Running the retail demo app requires a Fireblocks testnet workspace. Complete activating your workspace with the workspace Owner before proceeding with this guide.
- Create an API user to execute the backend processes. Our implementation requires a single API user with signing privileges to simplify the integration, for a production-grade application please consider these best practices when creating your API users and access levels.
-
Upload the
fireblocks-secret.keyfile to thekeysfolder on the backend root project folder (create one if not yet created). - Complete the API user setup and the pairing to an API Co-Signer.
-
Copy the API user ID from the console UI and update it in your
.envfile of the backend library (more details below). - Enable One Time Address (OTA) to allow user withdrawals.
-
Determine your Omnibus vault account and copy its ID (found on the vault account page URL) and update your
.envfile in the backend library (more details below). -
Create your withdrawal vault accounts and update their IDs in the
.envfile. Note: If not manually set in the.envfile, the app will create the omnibus and 3 withdrawal vault accounts, and update the database accordingly on the initial run of the app.
Policy setup
Our retail demo app uses the Fireblocks Policy feature to govern the flow of assets between vault accounts and from the withdrawals accounts to external user wallets. Use the below example to tailor your policy and update it on your testnet workspace. This simplified Policy rule set dictates that the API Admin user will be able to perform rebalancing and sweeping transactions (any vault account to any vault account), and perform user withdrawal transactions (from the 3 withdrawal vault accounts to OTAs).
This Policy example is a very simplified rule set that only shows the bare minimum rules required for the demo app to run smoothly. For production level apps, please consider hardening your policy as required by your operations.
Test coins funding
In order to run the demo app, an initial deposit of test coins is required to the withdrawal vault accounts. Please fund your withdrawal vault accounts with the sufficient balance of tokens and according to the supported assets list found here. Optional public faucets to use: Bitcoin Test tokens Sepolia Test tokens Solana Devnet tokensWebhooks setup
The retail demo app listens to webhooks from Fireblocks and triggers business operations and database updates based on specific events, follow this guide to properly configure your environment to receive webhook messages from Fireblocks.- Configure a local tunneling service like
ngrokorexposedand forward the messages tohttp://localhost:3000. - Copy the publicly available URL of the tunneling service.
- Configure the URL as a webhook server on your Fireblocks testnet workspace’s general settings.
- Important: The app’s webhook endpoint is configured on the
./webhookpath, make sure you add it to the public URL provided by the local tunneling tool you use (example:https://1e70-94-188-131-83.ngrok-free.app/webhook).
Rebalancing Automation
The retail demo app utilizes Fireblocks’s Automations feature to trigger rebalancing transactions from the omnibus vault account (where all user deposit accumulates) to the withdrawal vault accounts. Below, you will find an example of an automation created to facilitate the above. Use it as a reference when creating your automation.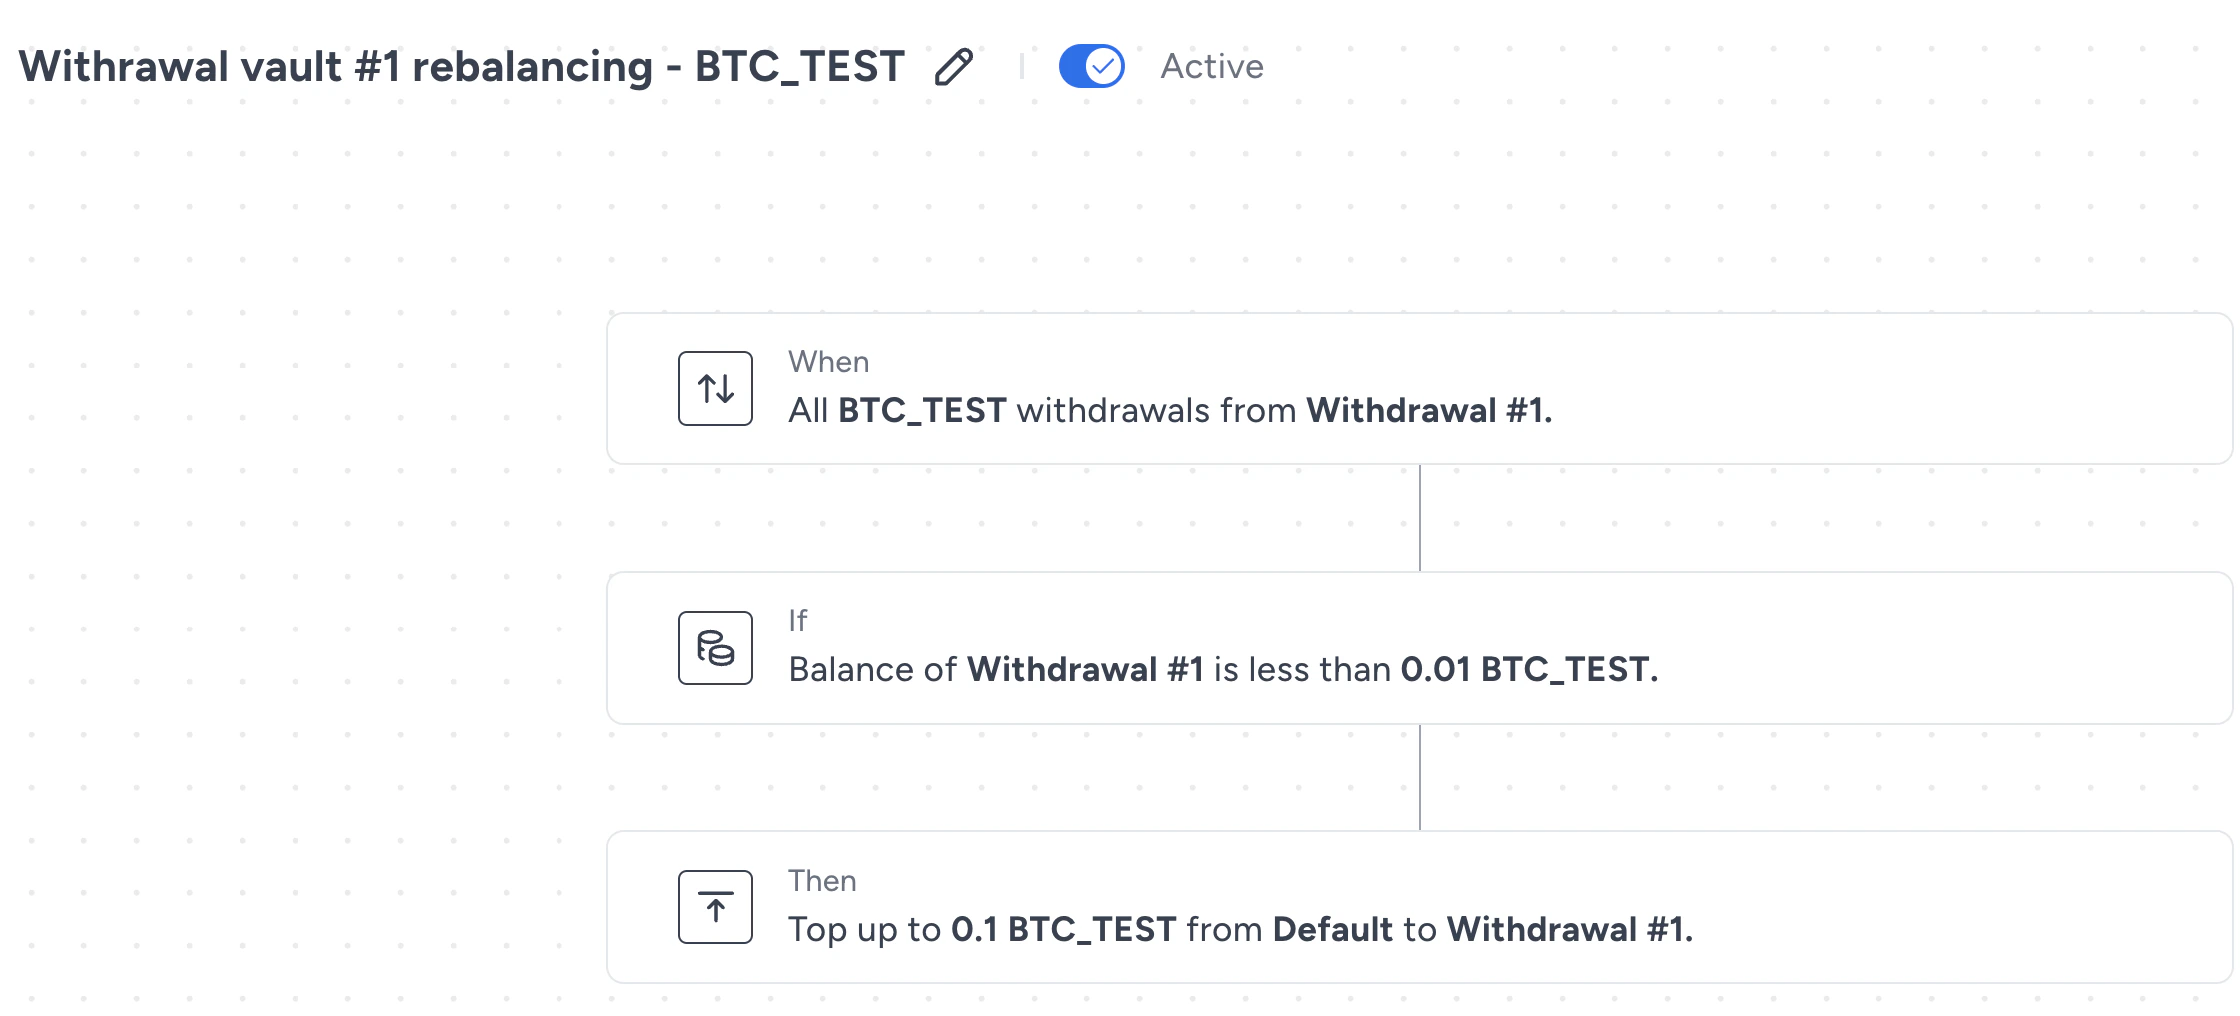
- This automation will be triggered by any BTC_TEST withdrawal from withdrawal vault #1.
- Once the withdrawal is completed, the remaining balance of BTC_TEST in that vault will be checked.
- If the remaining balance is lower than 0.01 BTC_TEST, a rebalancing transaction will be triggered to top-up the balance up to 0.1 BTC_TEST.
- An automation should be created for each supported asset on every withdrawal vault account.
- The amounts used above should be changed based on the anticipated operation in your app.
Running the application:
The retail demo app can run with Docker or locally, both options require updating the environment variable files for both the backend and frontend servers.Backend environment variables
Note: You may use the .env.example file as reference. Here’s a detailed explanation of each variable:Database Configuration
DB_NAME: Name of the MySQL database (default: retail_demo)DB_USER: MySQL user (default: root)DB_PASSWORD: MySQL passwordDB_HOST: Database host (default: localhost)DB_PORT: Database port (default: 3306)
Authentication
Google OAuth 2.0 docsGOOGLE_CLIENT_ID: Google OAuth client IDGOOGLE_CLIENT_SECRET: Google OAuth client secretGIT_CLIENT_ID: GitHub OAuth client IDGIT_CLIENT_SECRET: GitHub OAuth client secretJWT_SECRET_KEY: Secret key for JWT token generationJWT_REFRESH_KEY: Secret key for JWT refresh token generation
Fireblocks Configuration
FIREBLOCKS_API_KEY: Your Fireblocks API keyFIREBLOCKS_PATH_TO_SECRET: Path to your Fireblocks secret key file
Application Settings
PORT: Port on which the server will run (default: 3000)FRONTEND_BASE_URL: URL of the frontend application
Vault Configuration
OMNIBUS_VAULT: ID of the Omnibus vault in FireblocksWITHDRAWAL_VAULTS: Comma-separated IDs of withdrawal vaults in Fireblocks
Frontend environment variables
NEXT_PUBLIC_BACKEND_BASE_URL: http://localhost:3000CMC_API_KEY: your_coinmarketcap_api_key
Run with Docker:
Prerequisites:- Install Docker and Docker Compose.
- Update the
.envfiles for both servers, as mentioned above.
- Build and Run the Docker container:
- Navigate to
http://localhost:3001/loginonce the container is up and running to access the app console UI.
Run locally:
Prerequisites:- Install MySQL.
- Install the BE dependencies:
- Install the FE dependencies:
- Run the backend server:
- Run the frontend server: (on another terminal)
- Navigate to
http://localhost:3001/loginto access the app console UI.
Setup script:
The setup script will run only the first time you start the app. It will initialize the connection to the database, create the tables and configure the default data fields. The setup script uses theOMNIBUS_VAULT and WITHDRAWAL_VAULTS variables to determine whether to create new vault accounts or use existing ones:
-
If
OMNIBUS_VAULTis empty:- The script will create a new vault account in Fireblocks called “Omnibus Vault”.
- It will then create a BTC_TEST wallet in this vault account.
-
If
OMNIBUS_VAULTcontains a value:- The script will use the provided vault ID as the Omnibus vault.
- It will not create a new vault account in Fireblocks.
-
If
WITHDRAWAL_VAULTSis empty:- The script will create three new vault accounts in Fireblocks named “Withdrawal Vault #1”, “#2”, and “#3”.
- It will create SOL_TEST, ETH_TEST5, and BTC_TEST wallets in each of these vault accounts.
-
If
WITHDRAWAL_VAULTScontains a comma-separated list of vault IDs:- The script will use these IDs as the withdrawal vaults.
- It will not create new vault accounts in Fireblocks.
Backend Application Details
This backend application showcases how to integrate Fireblocks’ services into a typical retail-facing scenario. Key features include:- User authentication (supports Local, Google, and GitHub)
- Wallet creation and management
- Asset creation and balance tracking
- Transaction processing
- WebSocket integration for real-time updates
- Integration with Fireblocks API for vault account and transaction management